| Rendering Intents | |
|---|---|
|
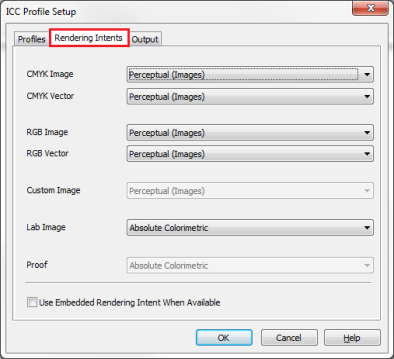
Rendering Intents control how a profile is applied and how the colors are mapped from one gamut to another. Because printers must take into account gamuts, white point, and other variable factors, [Rendering Intents] allow one profile to be used for different circumstances. You can choose a rendering intent for images as well as vector objects.
(Job Editor)
NOTE: Depending on the type of data in your image, some options may not be available. If you are working with a PDF file or a Quick Set , you can choose a [Rendering Intent] for both image and vector data and Lab Images. The [Proof] option is disabled unless a Proof ICC is selected on the [Profiles] tab. Proofing allows you to simulate the Rendering Intent as if you were printing on another printer.
(RIP-Queue)
Note: Depending on the type of your image data, some options may not be available.
The options on the [Rendering Intents] tab of the "ICC Profile Setup" dialog allow you to select the rendering intent you want to use. If you are working with a PDF file or a Quick Set,you may choose a rendering intent for [Image], [Vector] data and [Lab Images]. The [Consistency Simulation/Proofing] option is disabled unless a Consistency Simulation/Proofing ICC is selected on the Profiles tab. The rendering intent for Consistency Simulation/Proofing allows you to choose how accurately to render the gamut of the target printer when proofing. The default for proofing is Absolute as it makes adjustments to preserve the media color. For Consistency Simulation it is recommended that Relative with Black Point Compensation be used to avoid clipping of shadows and compensate for differences in media white point. For more information, see Proofing.
[Rendering Intents] has the following options:
This option is used to give images pleasing color. It adjusts all the colors in an image to smoothly blend with colors that are mapped from outside the gamut of the output profile. Every color changes slightly, but the overall result of your image looks pleasing because the relationships between the colors stay the same. This is the default setting.
This option is used for proofing when you need to reproduce in-gamut colors as accurately as possible, but do not want to simulate the final output substrate color. It accurately reproduces the colors within the printer's range, and adjusts the out of gamut colors to fall within the printers range. This can result in some strange color patterns because the out of gamut colors cannot be reproduced accurately. This setting uses the color of the output media as the white point. When proofing, this proofs only the image and assumes that the media white point is the same as the final media.
This option is used for proofing when you want to simulate the output of one printer on another as accurately as possible, including substrate color. It accurately reproduces all the colors within the printer's range, but clips the out of gamut colors. This setting simulates the white point of the input profile.
This option gives you the best solid hues. It takes all the colors and scales them to the brightest saturation possible. This is most suitable for printing when color impact is more important than color accuracy, such as when you print vector objects with bold, bright colors.
This option, created by ONYX Graphics, Inc., allows for an improved CMYK color workflow. It preserves hue and relative saturation by mapping the input CMYK gamut directly to the output CMYK gamut. If the output gamut is larger than the input gamut, the output will be more colorful than the source image. Use this rendering intent with a CMYK source workflow. Using this option with an RGB source workflow provides the same results as the [Perceptual (Images)] option.
This option will adjust the black point to maintain shadow detail. For example, this will take the [Relative] rendering intent and adjust the black point so that the dynamic range is comparable to the [Perceptual] rendering intent which usually has more shadow detail, especially with RGB images. TIP: To learn more about Rendering Intents, see Max-imize article. For more information about Black Point Compensation see a PDF of Max-imize article
This setting overrides any rendering intent selections and uses embedded rendering intents if the file contains them. Embedded rendering intents are only possible with PDF files. Since an embedded rendering intent is configured specifically for that image, using this option ensures the color will render as the creator intended.
|
Figure 1: Job Editor
Figure 2: RIP-Queue
|